Gluten Free Brownie Cookies


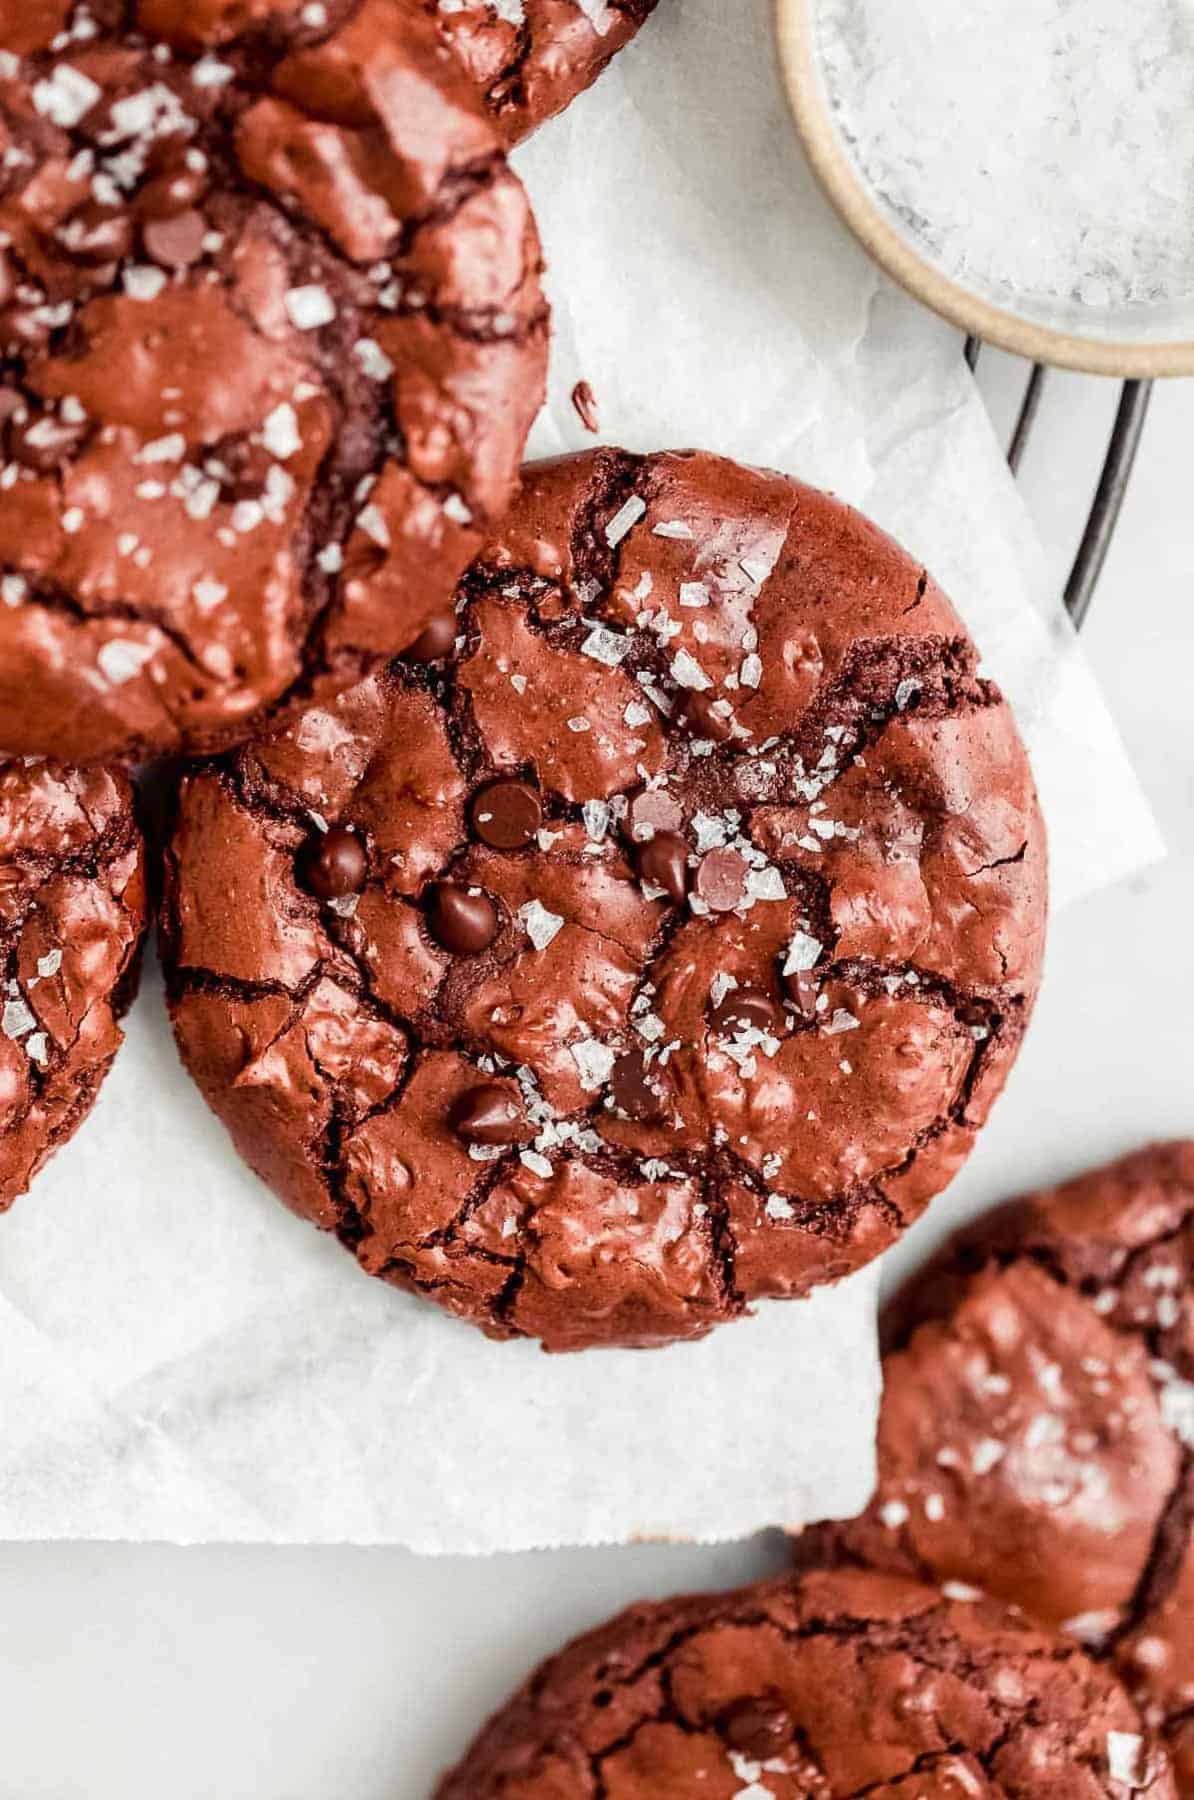
Fudgy, chewy and easy to make, these chocolate gluten free brownie cookies are the ultimate recipe to satisfy that chocolate craving. With a gorgeous shiny and crackly crust, these cookies are bound to impress.
If ya’ll saw my instagram stories the past couple of weeks, you know I’ve been going nuts trying to get these gluten free brownie cookies right!
I was initially attempting a vegan recipe, with absolutely no success. That would even be an understatement. They were not good. So I threw a couple of eggs into the mix and alas, they solved the problem. They normally do!
These gluten free brownie cookies have the same delicious flavor as regular brownies but in cookie form! These brownie cookies are made without butter- instead we’ll use coconut oil to get that chewy texture and crackly top.
They have gorgeous shiny and crackly crust (can a cookie have a crust, idk, but we’ll call it that) and a deliciously fudgy center. Kind of like my chocolate crinkle cookies! If you love this recipe, try my chocolate peppermint cookies or gluten free M&M cookies next!
Why you’ll love this recipe
- Rich & fudgy
- Easy to make
- Gluten free & dairy free
- Crowd pleasing!

How to make gluten free brownie cookies
Preheat the oven to 350 degrees Fahrenheit. Line a baking pan with parchment paper and set aside.
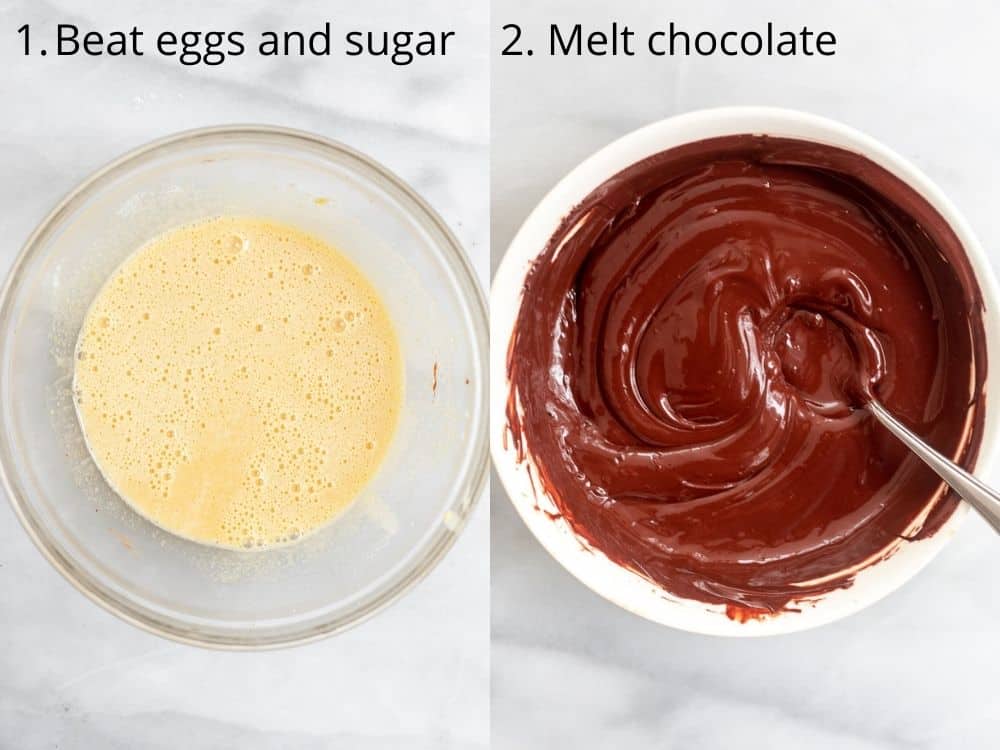
Add the 8 ounces of chocolate (please note this is 8 ounces by weight, not volume! see notes if you don’t have a kitchen scale) to a bowl and melt in 30 second intervals in the microwave, stirring between each interval until fully melted.
Alternatively, add to a double boiler and melt on the stove. Melt the coconut oil and measure out 1/3 cup. Set the chocolate and oil aside for now.
In a mixing bowl or bowl of a stand mixer, beat together the eggs and sugar for about 2 minutes. The long mixing time is key for the shiny crackly tops! After 2 minutes, beat in the coconut oil, melted chocolate and vanilla.
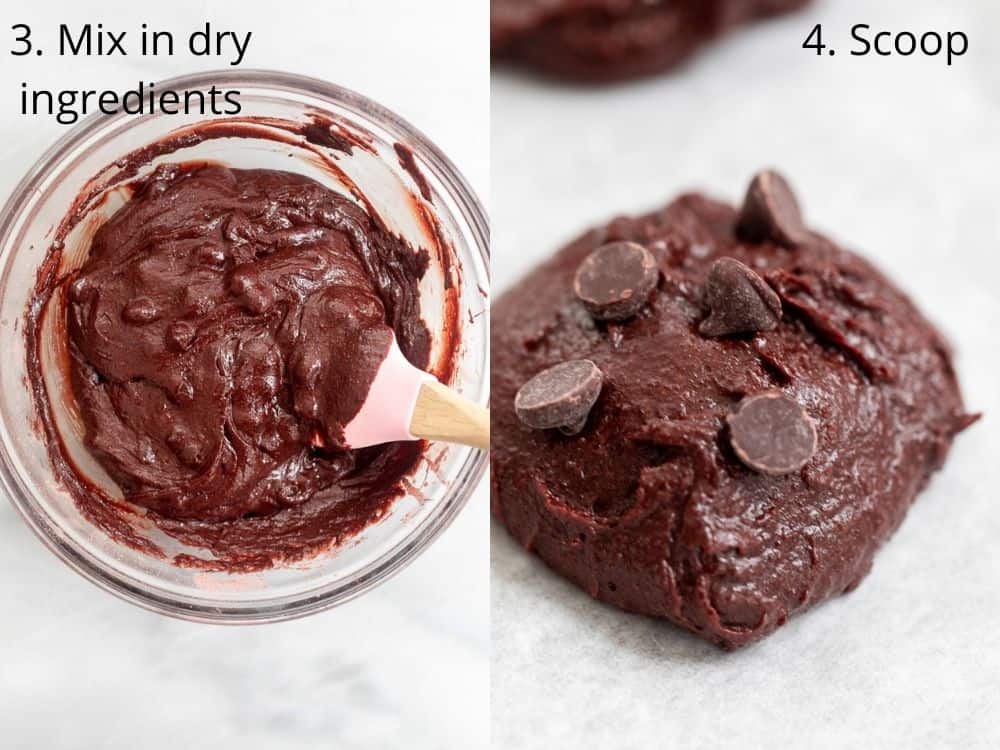
Beat in the cocoa powder, corn starch, flour, baking powder and salt. Be sure to spoon and level the flour. If you’re using the espresso powder, also add this in now. I usually don’t use it, but if you want a really rich chocolate flavor, it will do just that!
The batter will be like a thick brownie batter, but not thick like traditional cookie dough. This is what you want!
Fold in the chocolate chips. Spray a medium cookie scoop with oil (will help with the scooping since the dough is a bit sticky) and quickly scoop the dough and add to the prepared baking sheet, leaving a bit of space in between for spreading.
Bake for 12-14 minutes, I usually do 12 in my oven. They will continue to firm up as they cool so you want them slightly soft when they come out of the oven.
WANT TO SAVE THIS RECIPE?
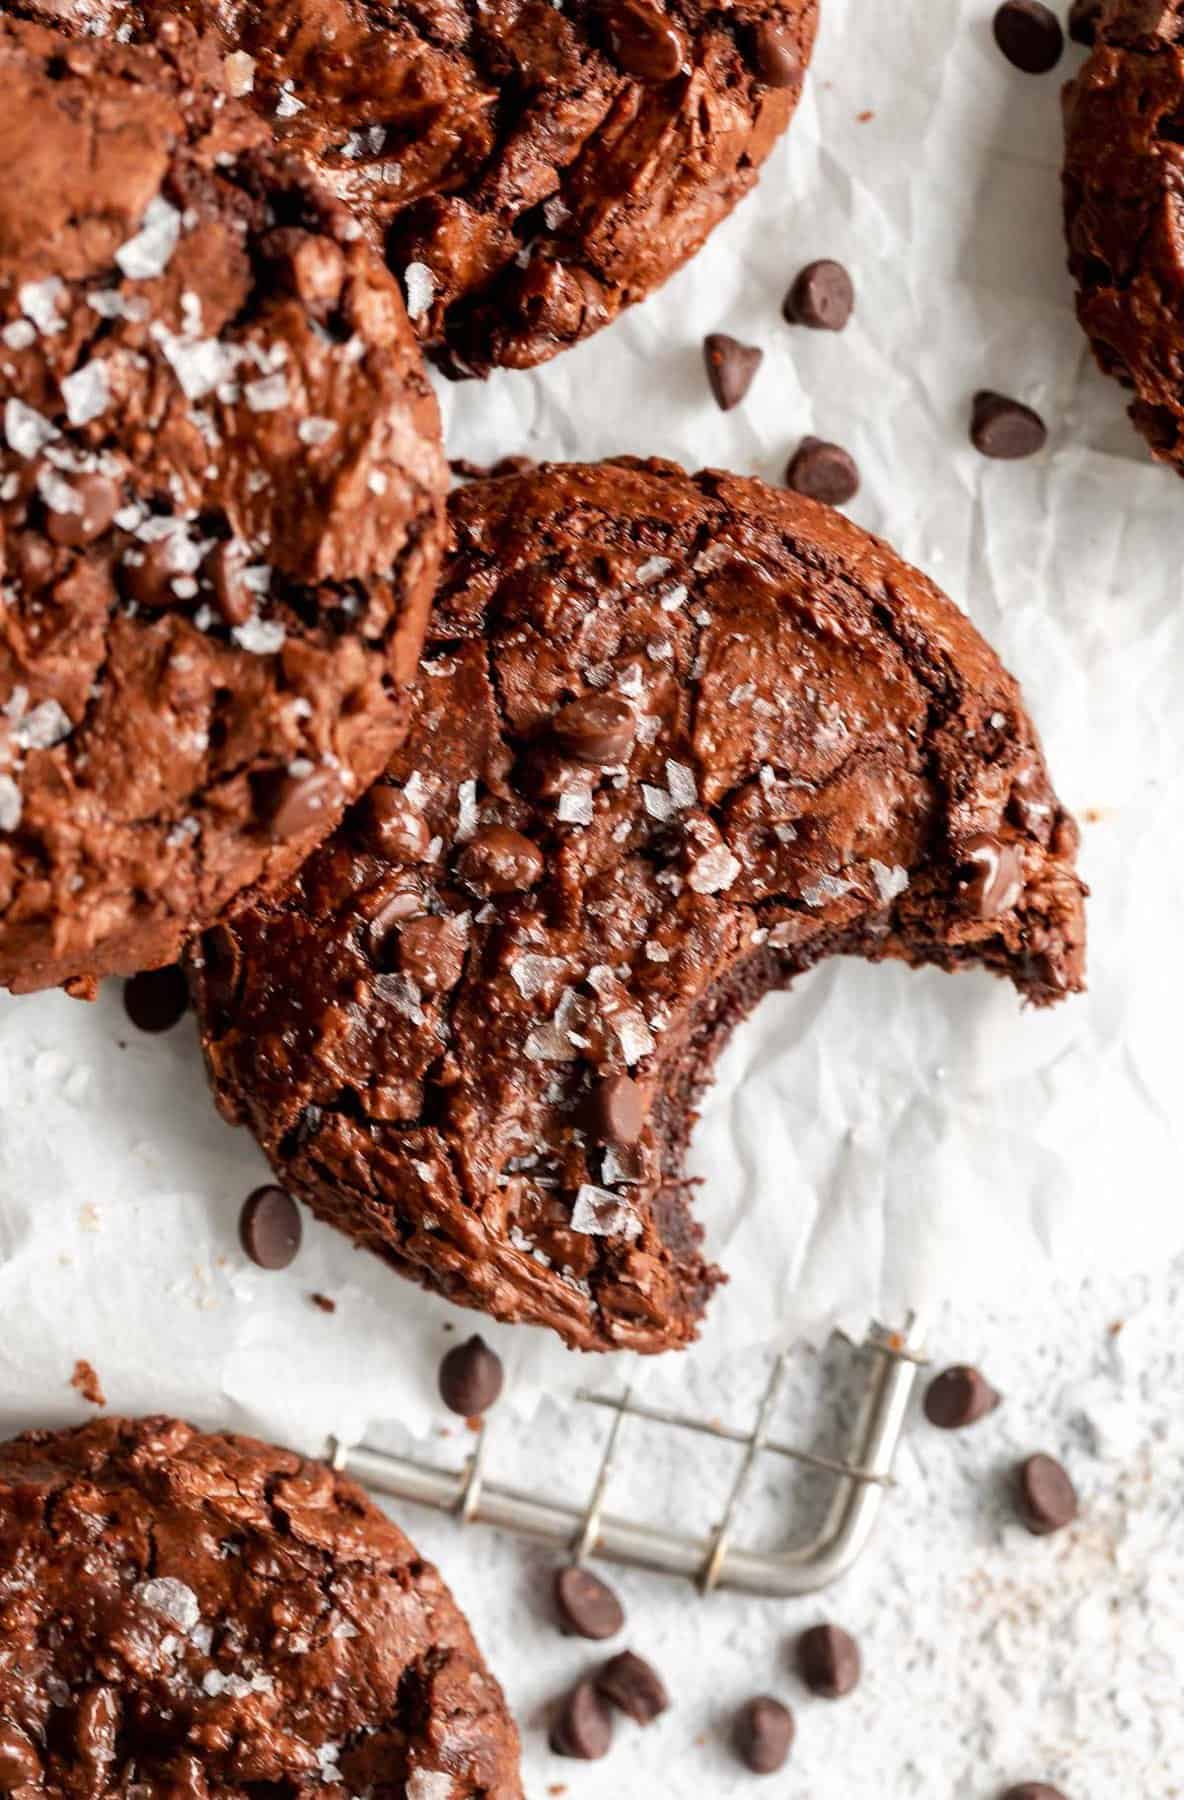
Use a round cookie cutter to swivel around the cookie to create a perfectly round shape. Let cool on the baking tray, then sprinkle with sea salt flakes and enjoy! Try my gluten free skillet brownie next!
Tips for crackly tops
Cream the eggs and sugar. Using an electric mixer to combine the eggs and sugar for several minutes. This will allow an almost meringue like substance to form around the cookies as they bake, which is what gives them their characteristic shiny tops!
Use good quality chocolate. I LOVE the Guittard semi-sweet chocolate chips for this recipe and virtually all of my recipes that require chocolate chips!
I personally love semi-sweet, which I recommend for this recipe. You can use a dark chocolate instead, but of course the cookies will be darker and more rich! Good or bad, depending on what you like!
Bake ASAP! Not to be dramatic, but time is of the essence when making these brownie cookies!
They’ll still be delicious and fudgy if you wait a bit, but if you want crackly shiny tops, they need to get in the oven within a few minutes of making the batter. The sooner the better!

Can I make them vegan?
Unfortunately, no. If you follow me on instagram, you’ll know I tried and let’s just say it did NOT go over well. I have another vegan chocolate cookie recipe you can make instead, or my vegan brownies!
You can however, make them dairy free! Just use dairy free chocolate chips and be sure to use coconut oil and not butter. Refined coconut oil won’t add any coconut flavor.
Storage Tips
These brownie cookies can dry out if left to their own devices, so keep them in an air tight container where they will stay fresh and fudgy for about 3-5 days.
I like to warm them up in the microwave for just a few seconds before eating. They’ll be good as new! Brownie points (pun intended) if you crumble them over a scoop of vanilla ice cream. SO good.
You can also freeze these after baking! Let them cool completely, then transfer to a freezer safe bag or container for up to 2 months. Reheat in the oven at 300 until warm through the center.

Try these desserts next!
Lastly, if you want more recipes straight to your inbox, be sure to subscribe to my email list. As always, if you make this recipe, be sure to tag me on instagram and leave a comment below so I can see your creation!

Gluten Free Brownie Cookies
by: claire cary
Ingredients
Wet
- 8 ounces semi-sweet chocolate chips I like Guittard semi sweet chips
- 2 eggs room temperature
- ¾ cup + 2 tablespoons white sugar
- ⅓ cup melted coconut oil measured when melted, not solid
- 1 teaspoon vanilla extract
Dry
- ⅓ cup gluten free all purpose baking flour can sub regular AP flour if not GF
- 1 tablespoon corn starch
- 3 tablespoons cocoa powder
- 1 teaspoon baking powder
- ¼ teaspoon salt
- ½ cup chocolate chips
- optional: 1/2 teaspoon espresso powder helps create a really rich flavor
Instructions
- Preheat the oven to 350 degrees Fahrenheit. Line a baking pan with parchment paper and set aside
- Add the 8 ounces of chocolate (please note this is 8 ounces by weight, not volume! see notes if you don’t have a kitchen scale) to a bowl and melt in 30 second intervals in the microwave, stirring between each interval until fully melted. Alternatively, add to a double boiler and melt on the stove.
- Melt the coconut oil and measure out 1/3 cup. Set the chocolate and oil aside for now.
- In a mixing bowl or bowl of a stand mixer, beat together the eggs and sugar for about 2 minutes with an electric mixer.
- The long mixing time is key for the shiny crackly tops! After 2 minutes, beat in the coconut oil, melted chocolate and vanilla.
- Beat in the cocoa powder, corn starch, flour, baking powder and salt. Be sure to spoon and level the flour.
- If you’re using the espresso powder, also add this in now. I usually don’t use it, but if you want a really rich chocolate flavor, it will do just that! The batter will be like a thick brownie batter, but not thick like traditional cookie dough. This is what you want!
- Fold in the chocolate chips. Spray a medium cookie scoop with oil (this will help with the scooping since the dough is a bit sticky) and quickly scoop the dough and add to the prepared baking sheet, leaving a bit of space in between for spreading.
- Add a few extra chocolate chips on top if desired. The sooner you can get the cookies in the oven, the better. If the batter sits for too long, the cookies won’t get shiny/crackly.
- Bake for 11-14 minutes, I usually do 12 in my oven. They will continue to firm up as they cool so you want them slightly soft when they come out of the oven.
- Use a round cookie cutter to swivel around the cookie to create a perfectly round shape.
- Let cool on the baking tray, then sprinkle with sea salt flakes and enjoy! It’s important to let them cool completely, otherwise the center of the bottoms can stick to the parchment a bit, so try to wait a good 20-30 minutes if you can!
Notes

Comments
-
so easy to make
so delicious to eat!
Thank you from a GF and DF family
-
Yum! As a newly diagnosed celiac, these are my go-to cookies! You can’t even tell they’re gluten-free. In my opinion, better than regular brownies!
-
Makes me so happy! Thanks, Anna!
-
-
These brownie cookies are so rich and gooey. Perfect chocolatey treat.
-
Thank you, Jessica!
-
-
Do you think coconut sugar be substituted for the white sugar? I usually sub it for most of my baking, but sometimes it does alter the flavor slightly.
-
I don’t recommend that for this recipe! The white sugar is really key for that crinkle texture and the best flavor.
-
leave a comment and rating