Crispy Baked Teriyaki Tofu
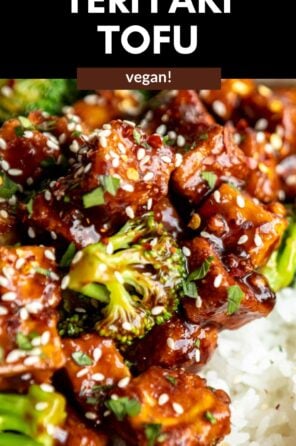


Seriously crispy and packed with flavor, this teriyaki tofu recipe is bound to convert ever tofu hater into a tofu lover. It’s easy to make, perfect for buddha bowls, noodle bowls, stir fries or a quick and simple vegan dinner!

I have a love hate relationship with tofu. Anyone else? I’ve had my fair share at failed tofu attempts. I’ve tried seasoning it with all sorts of things, only to end up with a mushy blob that tasted like virtually nothing.
Thankfully, I’ve come a long way since then and I’m here to share all of my tips with you! This teriyaki tofu recipe is everything you think tofu shouldn’t be. Crispy, flavorful, easy to make and bound to please any type of eater. Plus, this teriyaki sauce can be used on all sorts of other recipes like my poke bowl.
This baked teriyaki tofu is vegan, gluten free, so crispy, easy to make and perfect served over fresh jasmine rice! Try my teriyaki noodles or air fryer cauliflower next!
How to make teriyaki tofu
I wanted a method of tofu making that would yield incredibly crispy tofu, without the need for deep frying. This teriykai tofu recipe is baked so it doesn’t require copious amounts of oil, and it’s more or less hands off!
First, remove the tofu from the package and drain out any excess liquid. Place the block in between two kitchen towels or a few paper towels.
Add a heavy object on top. I like to use a few books or a tea pot filled with water. If you have a tofu press, perfect! But I find any heavy object works just as well.
Let the tofu press for about 30 minutes to remove extra liquid and to make sure it is as firm as can be!

This is going to help it crisp up and ensure the inside of the tofu isn’t mushy. Once pressed, cut the tofu into small cubes, about 1 inch.
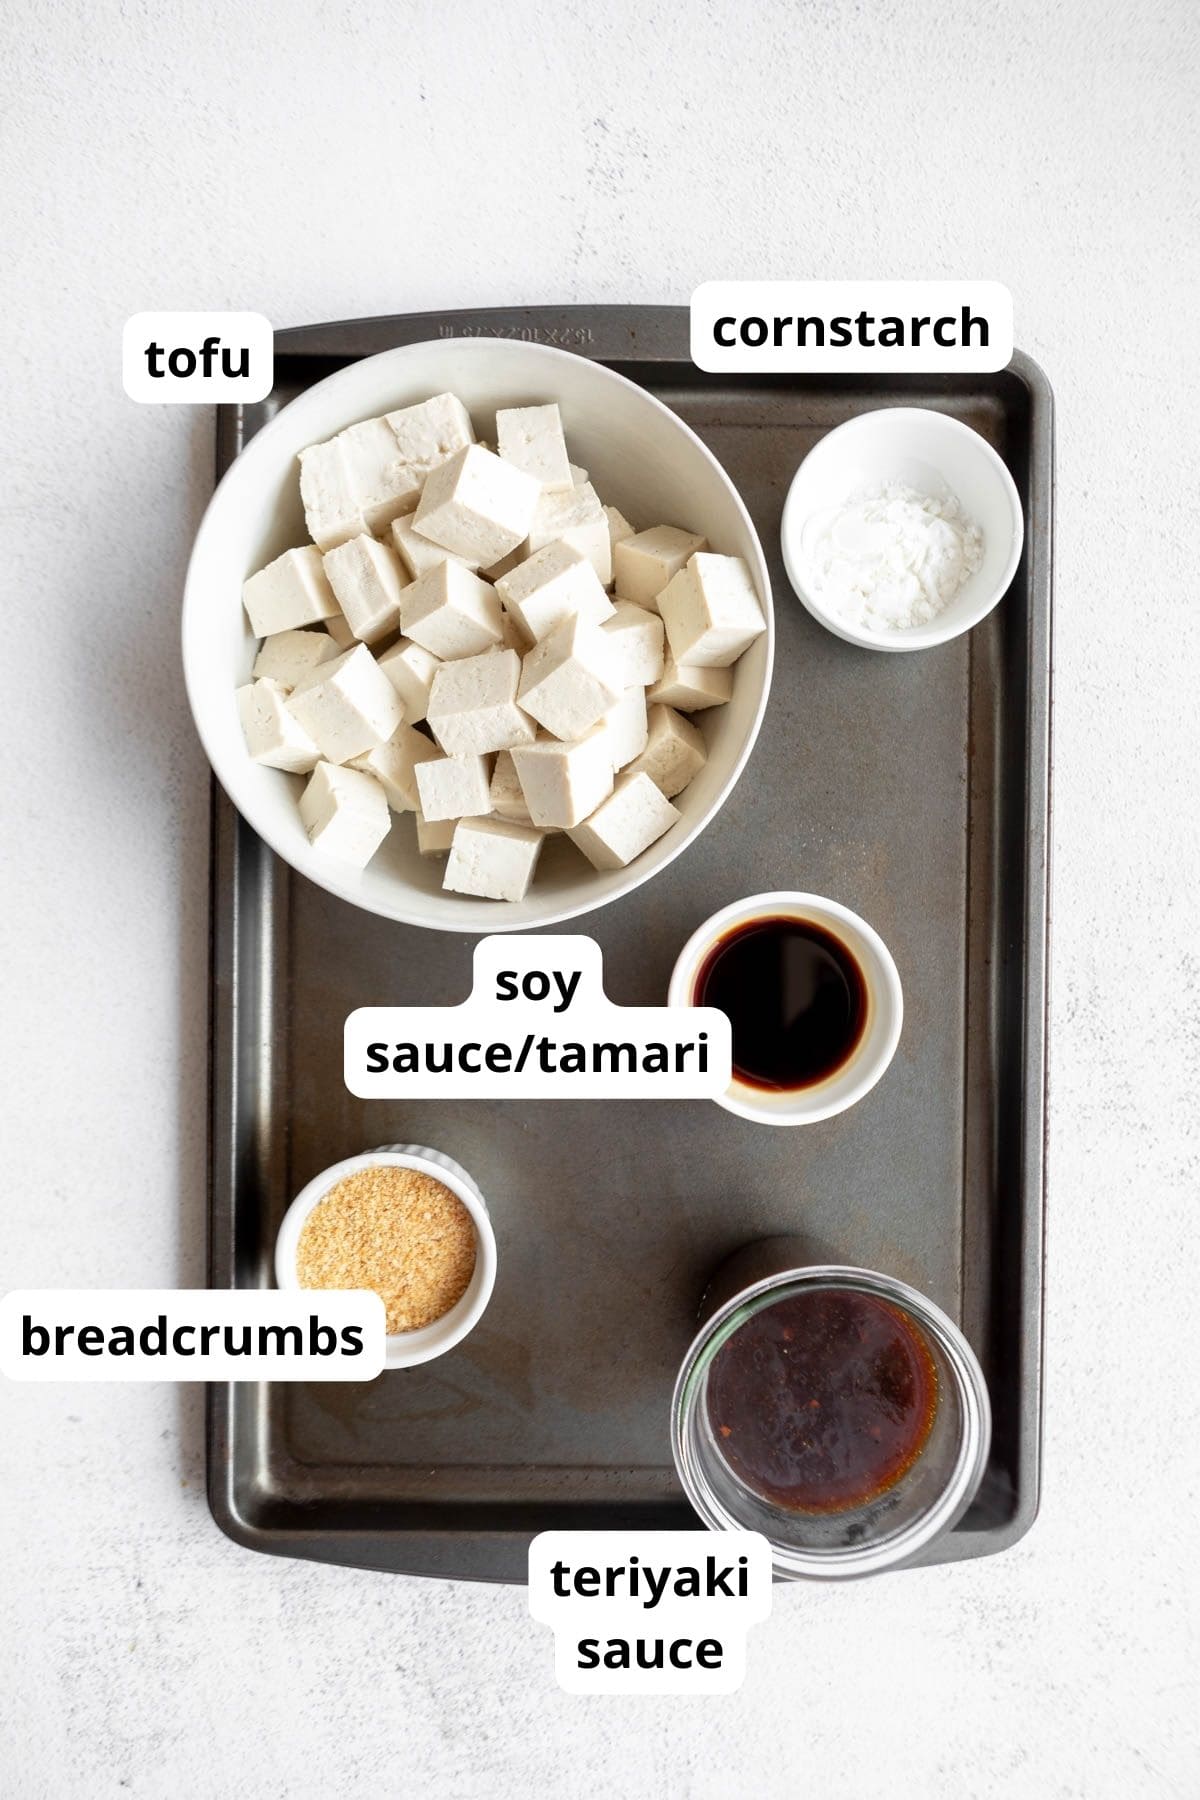
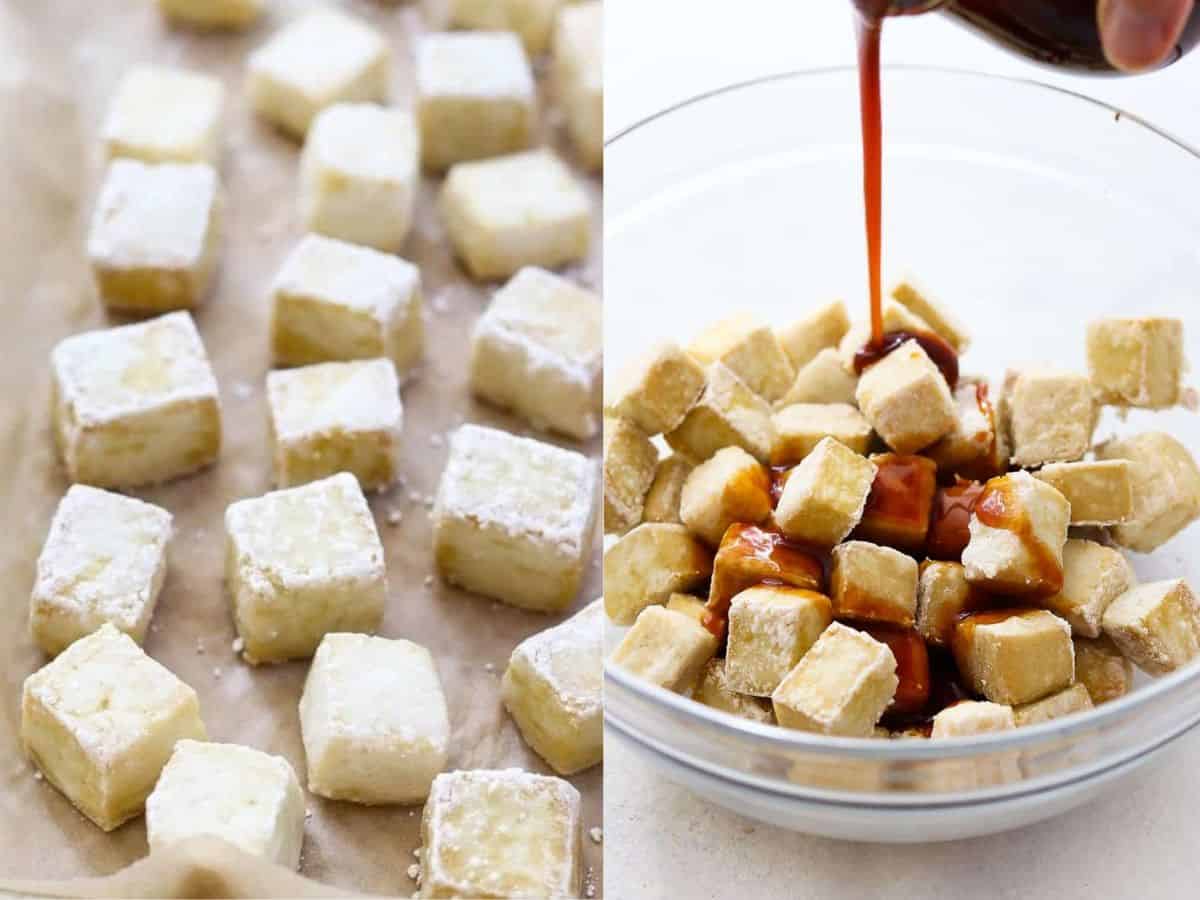
Add the chopped tofu into a large bowl and toss with the soy sauce or tamari, cornstarch and breadcrumbs. Make sure every piece is well coated.
Next, add the tofu to a baking sheet lined with parchment paper or a silicone baking mat. Bake at 425 for 25-30 minutes or until nice and golden brown on the outside.
While the tofu is baking (or during the last 20 or so minutes) prepare the sauce. Let it come to room temperature before adding it to the tofu. If you add it right away, the tofu tends to get a bit soggy which we don’t want!
Once the tofu is done, transfer to a bowl and toss with the teriyaki sauce until well coated. Try my chipotle sofritas tofu or tofu crumble bowls next!
Flavor tips
Sauce is the key to flavorful tofu! And lots of it. I’m a big sauce girl.
This teriyaki sauce is the best way to add flavor to, well, anything. I love it with buddha bowls, salmon, and of course, this tofu.
WANT TO SAVE THIS RECIPE?
It’s salty, sweet, savory and has a sticky consistency which makes it perfect for tofu since it clings to the surface really well.
Serving suggestions
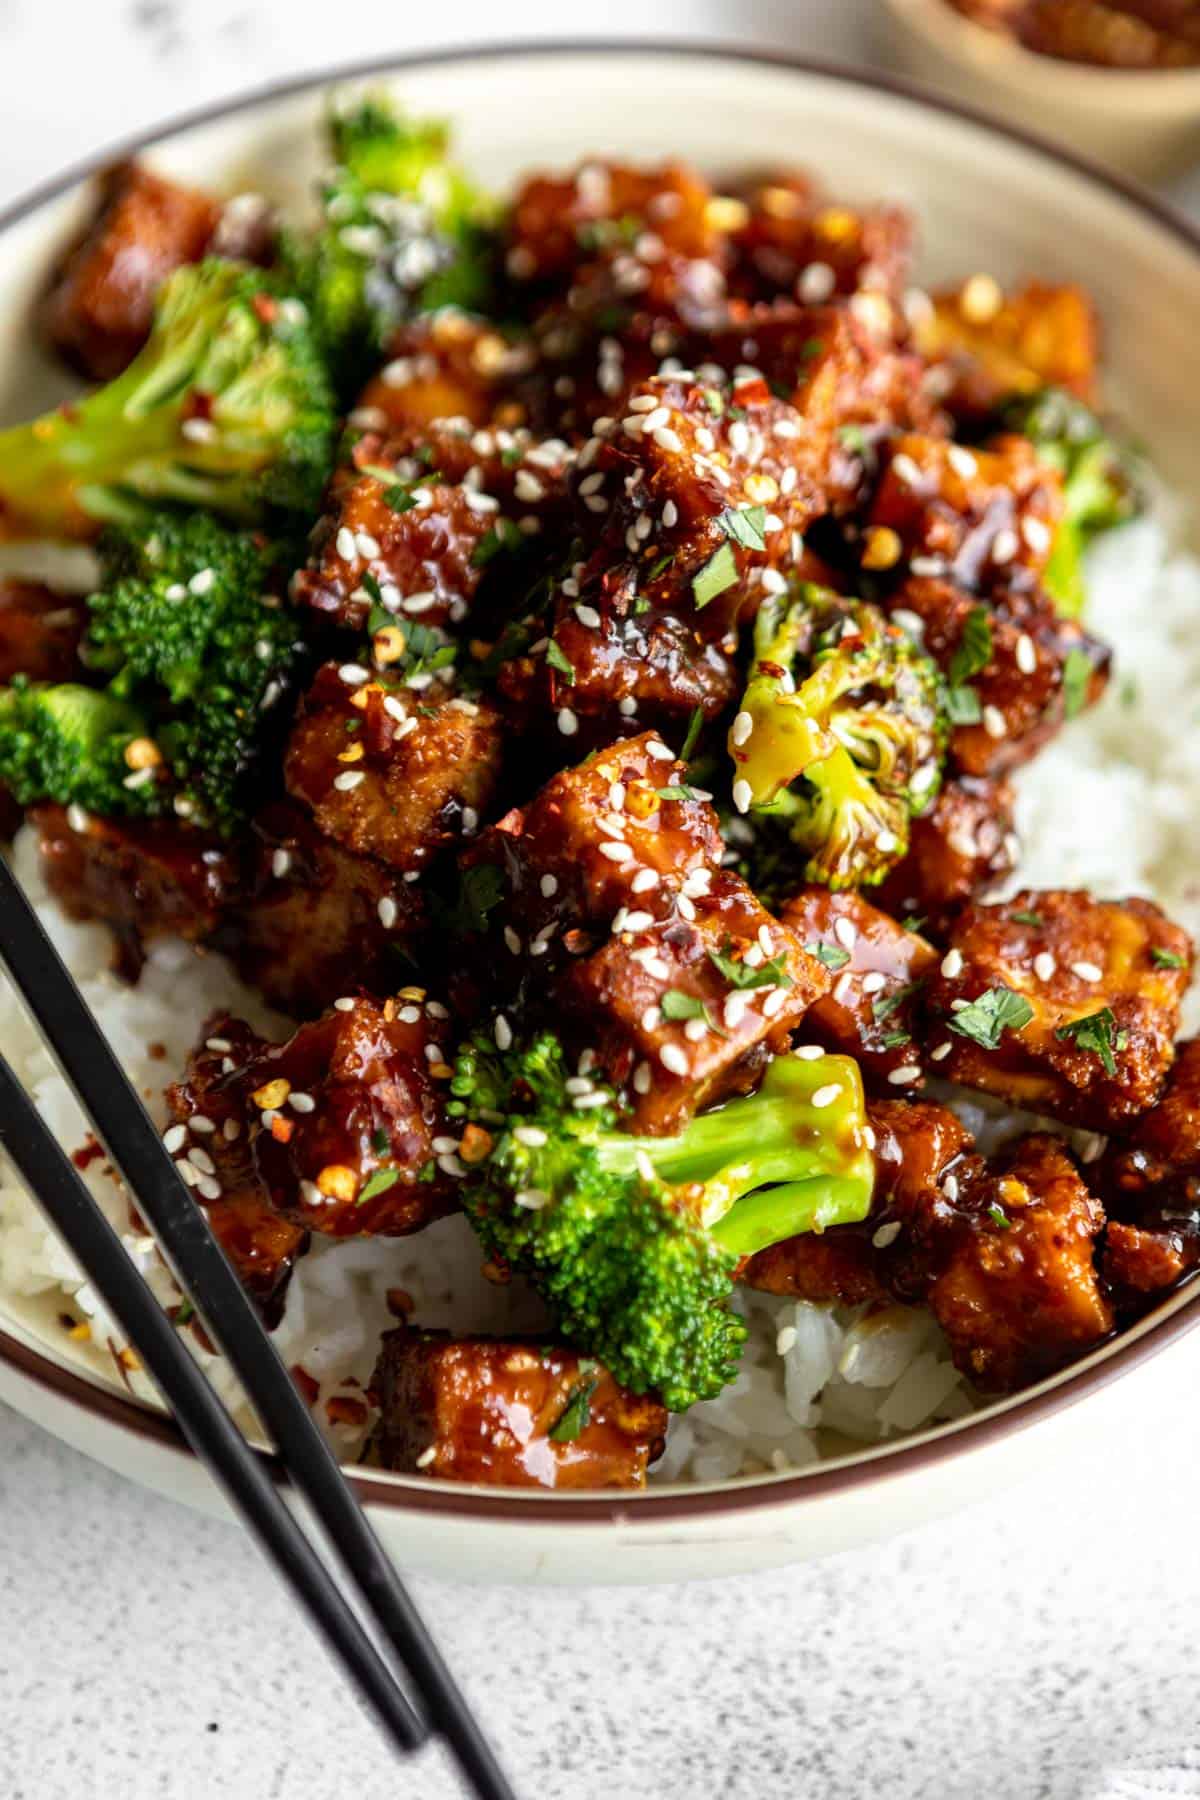
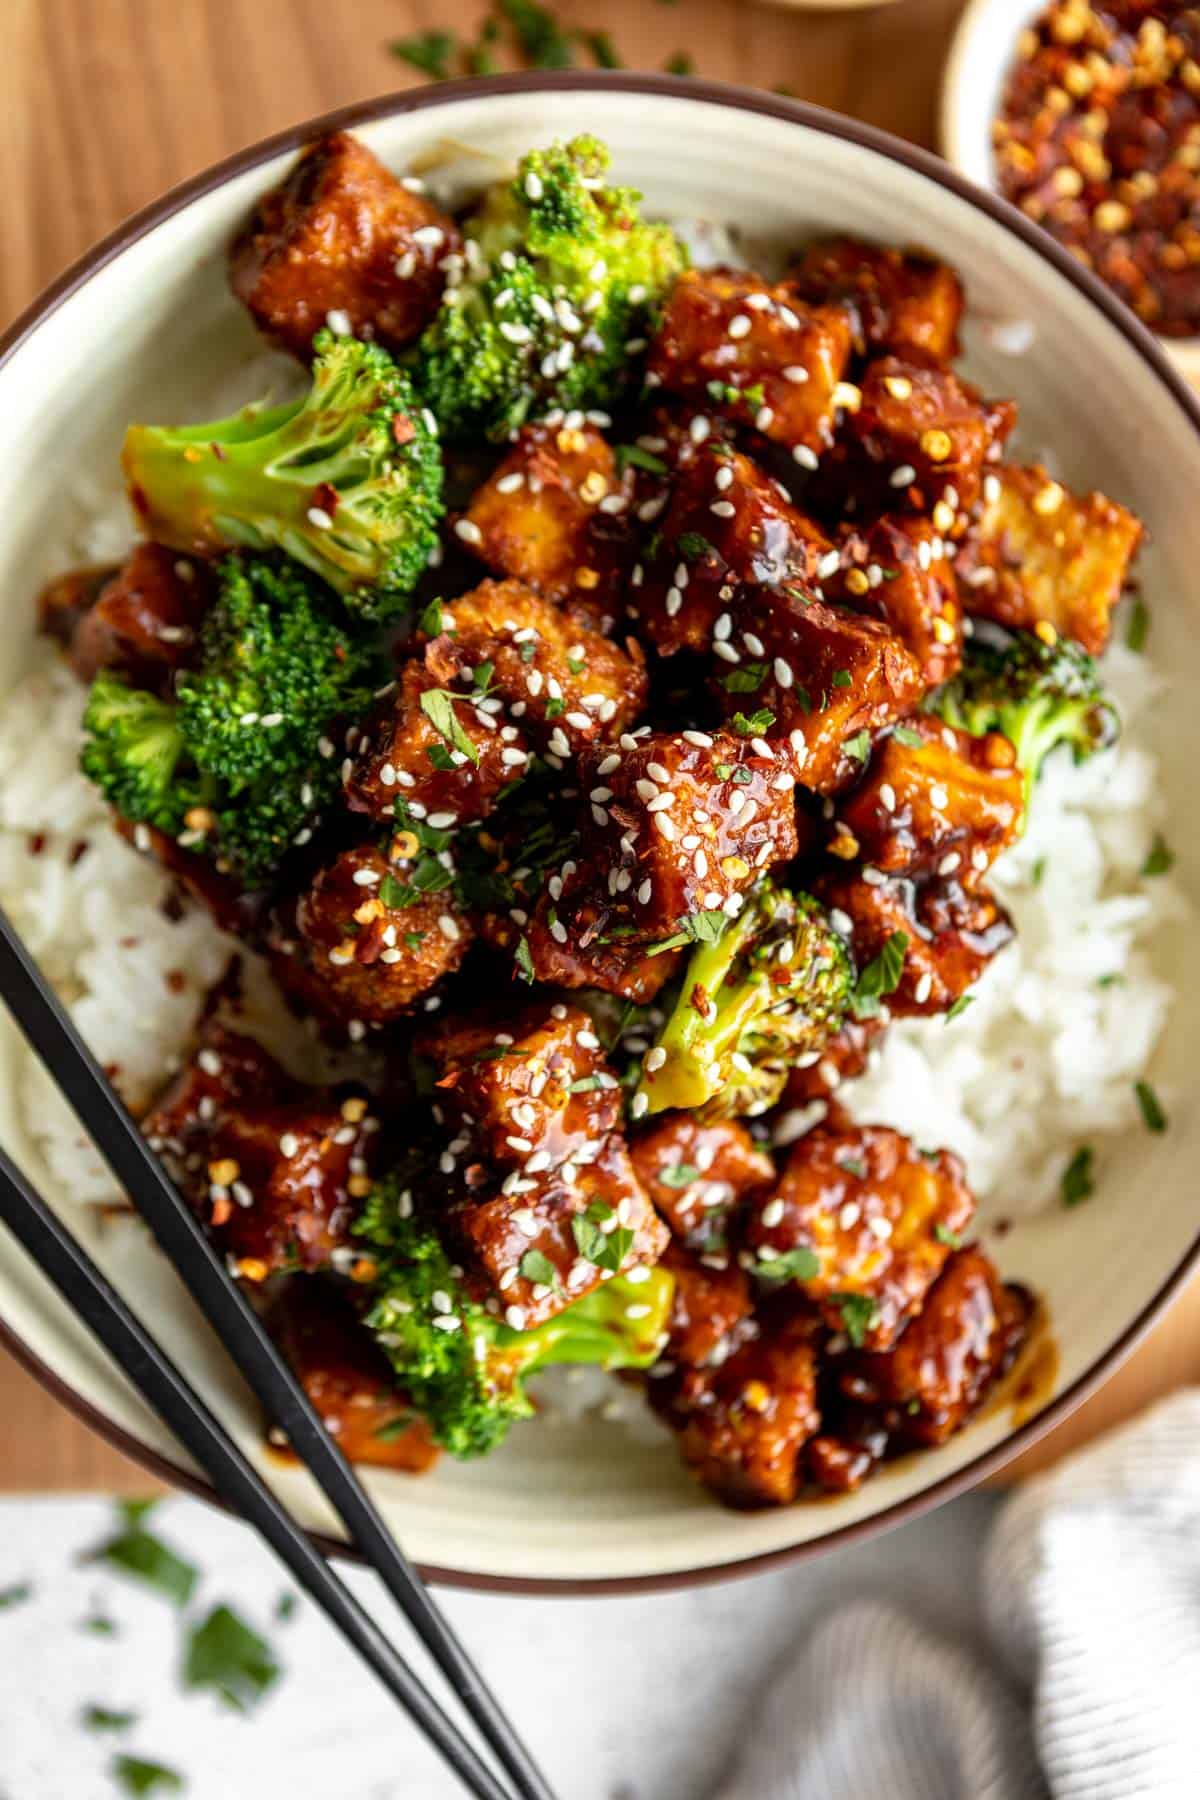
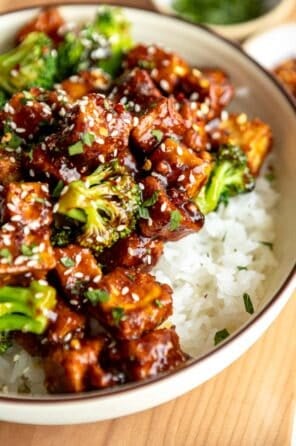
I love to serve this tofu buddha bowl style with some jasmine rice, steamed broccoli, avocado and lots of extra sauce drizzled on top.
A sprinkle of toasted sesame seeds and red pepper flakes on top adds some nice flavor, but is totally optional.
I often double the teriyaki sauce recipe to have enough to drizzle over the veggies & rice, but you do you! The sauce keeps well in the fridge for a week on its own.
Air fryer instructions
Yes! To make this teriyaki tofu in an air fryer, follow all steps through step 6, but then air fry in your air fryer at 375 for 15-20 minutes.
Shake the basket every 5 minutes and try to keep each piece of tofu away from each other so they don’t stick. Once done, transfer to a bowl and coat with the sauce! Or, just make my air fried tofu instead!
Do I need to marinate tofu?
It depends! This teriyaki tofu does not need to be marinated, and in fact, not marinating it is exactly what makes it crispy.
The sauce/flavor is all added after it is baked so it will be loaded with flavor without any marination involved!
How to store
Once prepared, the tofu will last in the fridge for about 2-3 days, but I highly recommend eating it right after preparing for best results. However, it won’t be quite as crispy once it’s refrigerated.
To reheat and get some crisp back, pop the tofu on a baking sheet lined with parchment paper and stick it in the oven at 250 degrees Fahrenheit for about 10 minutes.
Then drizzle with some extra sauce if you have it!

Try these next!
- Vegetarian Sushi Bowl
- Orange Chickpeas
- Orange Tofu
- Sesame Tofu
- Peanut Buuter Noodles
- Sticky Sesame Chickpeas
- Spicy Korean Tofu
Follow along on on instagram and subscribe to my email list for more recipes and updates. Leave a comment and rating below if you try this recipe and let us know how it turns out!
Crispy Baked Teriyaki Tofu
by: claire cary
Ingredients
- 1 block extra firm tofu 16 ounces
- 1 tbsp cornstarch
- 1 tbsp low sodium soy sauce/tamari
- 3 tbsp plain breadcrumbs I used gluten free
- 1 batch teriyaki sauce click for recipe
Instructions
- Preheat the oven to 425 degrees Fahrenheit.
- Remove the tofu from the package.
- Place it between two towels or a few paper towels and put a heavy object on top. (See notes for suggestions)
- Let the extra liquid press out of the tofu for ideally 30 minutes. If you’re in a hurry you can safely skip this step, but even just a few minutes will really help the tofu crisp up well!
- Once pressed, cut the tofu into cubes and add to a bowl.
- Toss with the soy sauce/tamari, then the breadcrumbs and corn starch and make sure every piece is well coated.
- Add to a baking sheet lined with parchment paper. Try to make sure none of the tofu cubes are touching. This ensures they get nice and crispy and don’t stick together.
- Bake for 25-30 minutes or until golden brown.
- During the final 15-20 minutes of baking, prepare the sauce. When the tofu is done, let it cool for about 5 minutes.
- When the tofu is done, transfer to a bowl and toss with about 2/3 of the sauce, saving a bit to add to rice and veggies if desired. Serve immediately and enjoy!
Notes

Comments
-
It came out perfectly made it for the first time, everyone loved it and I’m making it second day in a row because they loved it.🥰

-
i think that you need to toss the tofu with the tamari/soy ALONE first. Then add the dry breadcrumbs and cornstarch. Otherwise, the dry ingredients clump with the soy and the tofu doesn’t get coated. Will that work? Otherwise, its very good!
-
Yes, that’s what the recipe states!
-
-
Where is the recipe for the sauce?
-
Linked in the recipe card!
-
-
This looks fantastic, and I’m planning to make it for my daughter this Saturday, but I have a question.
When you say “toss with the soy sauce or tamari, cornstarch and breadcrumbs”, do you mean in that order, or mixed together? If not all together, I would expect it to go cornstarch, soy and then crumbs.
-
You really can do either way. I usually combine the cornstarch with the breadcrumbs and toss after the soy sauce. But cornstarch, then soy then breadcrumbs works great too.
-
I mixed all the elements and it didn’t stick very well….the breadcrumbs clumped together and it was impossible for me to coat evenly at all. Probably my method was off, the taste was great but the crumbs just fell off.
I may roll around in bread crumbs after coating tofu cubes in cornstarch soy mixture next time
I love baking vs even air frying for crispiness!!
-
You can try dipping the tofu individually in the breadcrumbs or omit the cornstarch if you’re really having issues.
-
-
-
-
I do not have bread crumbs can you use panko? Look wonderful
-
Panko is a breadcrumb!
-
-
Amazing!! I’m not a lover of tofu but my husband and son love it and as a vegan I am trying to love it. This recipe and way of cooking tofu may change my mind.
-
So glad you found something you love!
-
-
Looking forward to trying this! Do you think it would be a good idea to meal prep this dish? I.e, cook the tofu and then freeze and reheat when wanting to eat in microwave or would that ruin it completely? Ta xx
-
Tofu is always best served fresh! This isn’t my favorite recipe to meal prep, but you can try that!
-
-
My new favorite tofu recipe!! The bread crumbs made me 🤔 at first, but I just went along with it and they turned out amazing!!! Thank you so much for sharing this recipe ❤️ I love how it’s minimal prep (especially if you use “super” firm tofu) and then you just pop it in the oven and are greeted with perfectly crispy tofu bites after 30 minutes! I added garlic powder, msg, and vegetable oil before baking as a personal preference and they were phenomenal even without any sauce. I will definitely be using this as a base tofu recipe in the future!
-
Thank you, Kymber! So glad you enjoyed it.
-
-
The picture got me interested in it, and it is really good! I used extra ginger & next time will add the red pepper flakes.
-
Hey you haven’t mentioned the time for preheating the oven .
-
The preheating is included in the prep time!
-
This is delicious! Exactly as described! I’ve followed the instructions for the air fryer and it was perfection!
-
-
Can I make this on the stove? Like grill the tofu instead of baking? It looks so good! I’m very excited to make it 😆
-
I don’t recommend that! it wouldn’t get as crispy and the coating would probably fall off. I suggest baking or even air frying!
-
-
I was a little skeptical when I saw the breadcrumbs but oh wow! This recipe was so simple, straightforward, and absolutely delicious! I used a store-bought teriyaki sauce with it, but I’d definitely love to try to linked sauce next time. The texture of the tofu was so yummy that my husband almost opted to eat it over the teriyaki chicken that I made for him! This recipe is definitely a must try and I’ll definitely make it again with different sauces and cuisines.
-
Perfect! Yes it’s such a great base recipe and works well with so many types of sauces.
-
-
I’ve made tofu before – baked, fried, in soups, etc, but this was the first time my family gave it an enthusiastic “Wow! This is really good!” I will definitely making this again. Thanks for sharing this recipe!
-
Wow, love hearing that!! So happy you all enjoyed it!
-
leave a comment and rating